
 Hi Stampers. Welcome to the Pals monthly blog hop. We’re so glad you’re here! January is all about making “Art from the Heart,” featuring projects for Valentines Day, Thinking of You, Get Well, or Sympathy. You may be starting the hop here or coming from a previous Pal’s blog. Either way, you’ve come to the right place. You’ll find the the full line-up below to help you move, or “hop” along from Pal to Pal.

I chose to create my card using the Forever Lovely bundle from the Stampin’ Up! 2019 Occasions Catalog. My Forever Lovely card starts with a Thick Whisper White card base – 8-1/2″ x 5-1/2″, scored at 4-1/4″. Next I added a 4-1/8″ x 5-3/8″ layer of Sparkle Glimmer Paper. Next, I cut another piece of Thick Whisper White CS 4″ x 5-1/4″.
Stampin’ Tip: If you haven’t ordered glimmer paper since the new catalog, you should! They reformulated our glimmer paper last June and it is now easier to work with, it’s a little thinner (easier to die cut with) and doesn’t shed hardly any glitter!! I’ve always felt that Stampin’ Up! glimmer paper lost less glitter than what I could buy at the big box store. But, now it doesn’t shed hardly any – that’s just amazing!!!

Using the Lovely Flowers Edgelit Dies (part of the Forever Lovely bundle) I die cut the detailed floral edge on the 4″ x 5-1/4″ layer of Thick Whisper White CS twice. Once very close to the top and then another one just below that. I turned the die so that the cut portion both went into the card front (is that how to say that right?? See the photo to see what I mean). I then used the single edgelt die to cut two pieces of the Rose Glimmer paper and adhered that behind the detailed cutouts using glue dots. I wrapped a six inch piece of Whisper White metallic edge ribbon around the bottom and adhered it to the back with glue dots. Next, I made a small bow and attached it to the ribbon strip with glue dots. Then I adhered both of those pieces to the card front, over the Sparkle Glimmer Paper.
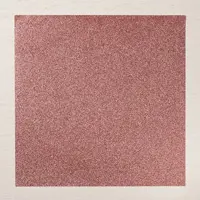
 This is a close up showing how pretty it looks when light hits the glimmer paper – isn’t it pretty?!?!
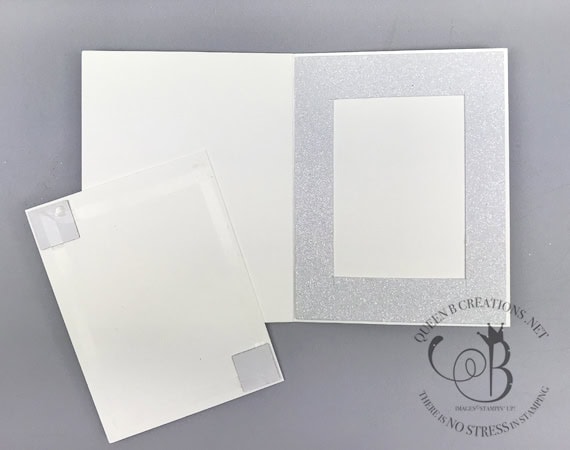
I lined the inside of the card with a 4-1/8″ x 5-3/8″ piece of Sparkle Glimmer Paper. Since the middle was being covered up anyway, I cut a rectangle out of the middle so I can use that on another project. Next, I cut a piece of Whisper White CS 3-3/4″ x 5″ and used the little corner pieces to cut the tiny holes (see photo below) in the upper right and lower left corner. I cut 3/4″ x 3/4″ squares of glimmer paper and adhered those behind the holes with a glue dot.

In the center of the inside layer, I stamped the sentiment “Wishing you a lovely day” (from the Forever Lovely stamp set) in Blushing Bride ink. This layer was attached to the Sparkle Glimmer Paper layer using snail and a few glue dots. (Note: I used the glue dots because glue dots seem to grip the glimmer paper better than snail adhesive).

I hope you found my card inspiring. If you did, I encourage you to leave me a comment below.
More inspiration awaits! Use the Blog Hop Line-up below to visit the rest of this month’s Design Team. My fellow Pals are excited to show you what they’ve created! Don’t forget to show us some love by commenting on our creations. Mark your calendars for Wednesday, February 13, 2019 when our Hoppin’ Pals share their “It’s Time to Sale-A-Brate” projects. Don’t miss the fun!
Pals Blog Hop Line-up:
- Mary Fish at Stampin’ Pretty
- Denise Hoepfner at The Mountain Magpie
- Jackie Beers at Blue Line Stamping
- Terri George at Stamp Me Crafty
- Linda Suarez at All Night Stamping
- Sara Stuart at Sentiments by Sara
- Leah O’Brien at Stamping by the Bay
- Beth McCullough at Stamping Mom
- Pamela Sadler at Stampin Pink Rose
- Su Mohr at Aromas and Art
- Rae Harper-Burnet at Wild West Paper Arts
- Lisa Ann Bernard at Queen B Creations
- Peggy Noe at Prettypapercards
- Jeanie Stark at Just Stampin’
- Katy McGloin at Just Fun Stamping
- Debbie Mageed at Secrets to Stamping
- Wendy Klein at Doggone Delightful Stampin’
- Lori Pinto at LollyPop Paper and Ink
- Tricia Chuba at ButterDish Designs
- Mary Hanson at Up North Stampin’
- Jennifer Michalski at Stamping Serenity
- Stesha Bloodhart at Stampin’ Hoot!
- Patti MacLeith at Paper Crafts by Patti
- Karen Hallam at Karen’s Stamping Habit
These are the supplies I used:
click on the picture to be taken to my store to purchase


Very elegant! I love the minimal stamping but elegance of glimmer and die cuts. Beautiful card.
Wow! Understated but really wow! Love all the sparkle!
Thanks
Lisa this card is so pretty…. delicate and romantic!!! Beautiful!
Thank you, Barb!
Such a pretty card, Lisa! Thanks for pointing out that the Glimmer Paper new and improved!
Thank you, Su. The new glimmer paper is amazing!
Sparkly, gorgeous card Lisa!
Thank you. I love sparkle. 🙂
Oh, you “had” me with the beautiful glimmer paper! Love the dies you used and this card would be great for many special occasions as well. Gorgeous!
Thank you for the sweet comment.
Glamorous card, Lisa!! This would be a great CASE for a wedding card!! TFS
Thank you. Yes, this would make a great wedding card!
Very pretty, lots of bling…
Thank you!
Gorgeous! Love all that glitters!!
Thank you. I love all that glitters, too!
Beautiful and lots of detail. THanks for sharing.
Thank you for your kind comment.
Lisa, this card really shines! I love how you created this understated look with the beautiful die cuts. Thanks for sharing.
Thank you so much for the kind words, Jennifer.
Sparkly and oh so lovely!
Thank you.
Wow! Simply stunning~!
Thank you for the nice comment.
Simply beautiful Lisa. I love your little crown too.
thank you, Rae. I love my little crown too *blush*.
So elegant!
Thank you. I appreciate your comment.
Glimmer paper does the trick in your beautiful card design!
yes, our glimmer paper is pretty amazing!
Glitter paper did the trick in your card design. Elegant.
Thanks, Kathy.