
Hi Stampers. Have you purchased the Geared Up Garage bundle yet? It’s so fun! I was so happy to see this suite in the 2019 Occasions catalog! It’s a fabulous stamp set and dies to create masculine cards with. The sentiment stamps are versatile enough to give you options for Everyday cards, Father’s Day, Birthday, Valentine’s Day (or any “love” occasion).

Today, I am on my way to the Stampin’ Up! OnStage event in Salt Lake City where I will get my hands on the new 2019-2020 Annual Catalog. Once I have that, I will know if this stamp set will be carrying over or retiring as of June 3rd, 2019. I will keep you posted!

This card stars with a Basic Black card base 8-1/2″ x 5-1/2″, scored at 4-1/4″. Next up is a 5-1/4″ x 4″ layer of Basic Gray CS. I used the Silver Embossing Paste, Pattern Party Decorative Masks and the Palate knives to create this awesome background on that Basic Gray layer. (I did several of them one day and let them dry over night before making the card.) The car, gas can and toolbox were stamped onto Whisper White CS using Versamark ink and embossed them using Silver Stampin’ Emboss Powder and my Heat Tool. I colored them with the Stampin’ Blends and die cut the shapes out with the coordinating framelits from the thinlits set.
Stampin’ Tip: The difference between a “framelit” and a “thinlit” is pretty simple. A framelit is just that – a frame, it goes around the image and cuts it out. A “thinlit” is a die that cuts out a more detailed die cut, such as the gears.
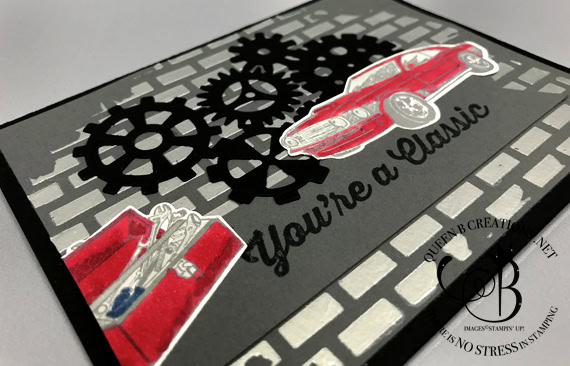
The gears were cut from Basic Black CS using the Garage Gears Thinlits Dies and my Big Shot. I then cut a strip of Basic Gray CS, 1-1/4″ x 5-1/2″, and flagged the end with the Triple Banner Punch. The sentiment was stamped onto this strip using Memento Black ink. The strip is attached to the background layer using liquid glue. (I suggest something a little stronger / thicker than snail adhesive due to the texture of the embossing paste). The toolbox, gears and car were attached to the background layer and then the excess of the toolbox was cut off from the back before adhering it to the card base.

For the inside of the card, I used a 5-1/4″ x 4″ layer of Whisper White CS. Before adhering it to the inside of my card I stamped the oil stains in Basic Gray ink, letting it hang off the edge a bit. It is adhered to the inside of the card using liquid glue (hey, I had it out for the rest of the card – why not?) To finish it off the gas can was adhered over the oil stains with the liquid glue. You can easily add “Happy Birthday”, “Happy Father’s Day” or whatever the occasion to the inside or you can leave it blank and have room to write a message. There are many possibilities…
Are you more of a visual learner? Here is a video explaining more on how this card was made:
If you wish to purchase any of these items, I have included a list of supplies used below with links to my online store. When you place your order, don’t forget to use this months Mystery Hostess code – from the bar on the right – for your chance to be this months hostess and earn FREE hostess rewards!
These are the supplies I used:
click on the picture to be taken to my store to purchase
If you enjoyed this post, please be sure to . . .
- Join me on Monday’s at 2:30 PM (MT) on my Facebook page for Facebook LIVE.
- Receive a FREE PDF tutorial when you subscribe to my monthly newsletter (exclusive offers) & daily blog updates here.
- Earn up to a $45 shopping spree with my Royalty Rewards Program.
- Check out the clearance rack and save up to 70%.
- Save 10% on coordinating product bundles!
- The $99 Starter Kit is the best deal of ALL! Discounts & benefits here.
- Visit my gallery for paper crafting ideas.
- Place an order and join my Queen B Creations VIP club for many more FREE PDF Project and Tips.
- Join my Online Classes to create some fabulous projects using Stampin’ Up! products with great layouts, fun folds & techniques you won’t want to miss
- Follow me on Pinterest.
- Subscribe to my YouTube paper crafting video tutorials.


